Facebook Pixels in Magento 2 Development
MarketingA Facebook pixel helps to track conversions(any action is done on your website) and to refine your advertising strategy. In short, it helps us to monitor how people interact with our website.
There are multiple events available to track website data.
List of Standard events:
Standard events provided by Facebook pixels are View content, Search, Add to cart, Add to wishlist, Initiate Checkout, Add Payment info, Make purchase, Lead, and Complete Registration.
These events track your store and show collected data in the Events tab in “Facebook Pixel” area.
An event tracks information as per its name suggest.
E.g. View content event tracks when someone lands on a page in our website. Likewise, other events get triggered and displays collected data to the store owner in “Facebook Pixel” area.
- View content: Someone visits a page
- Search: Someone searches on your site
- Add to cart: Someone adds a product in a cart on your site
- Add to wishlist: Someone adds a product to a wishlist
- Initiate checkout: Someone starts the checkout process
- Add payment info: Someone enters payment information while checkout
- Make purchase: Someone completes an order process
- Lead: Someone signs up for a trial on your site
- Complete Registration: Someone completes the registration process on your site
How to enable Facebook pixel in Magento store:
First of all, we have to create facebook pixel. Steps to create facebook pixel:
- Visit https://www.facebook.com/ads/manager/pixel/facebook_pixel
- Login with your Facebook credentials
- Click “Create a Pixel”
- Copy pixel Id you found on your pixel page (Refer Screenshot 1)
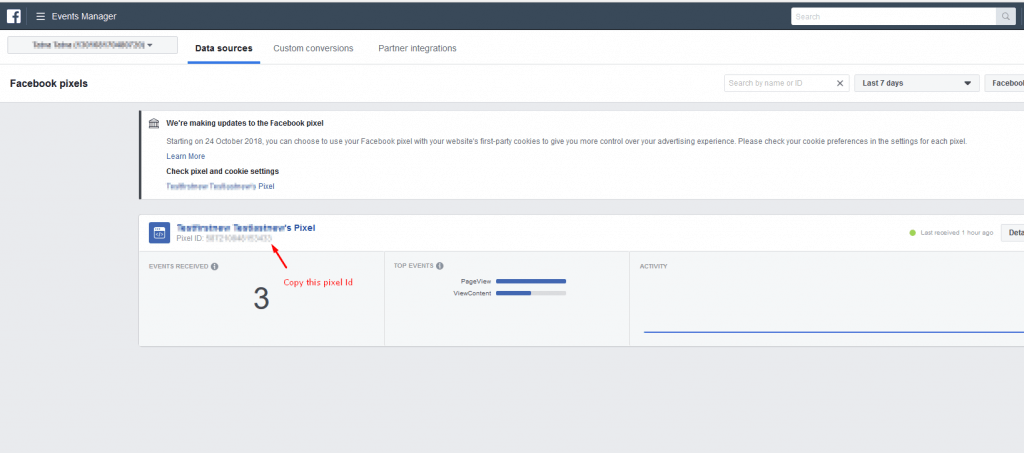
Screenshot 1
Steps to add Pixel Scripts in Magento Development:
- Visit https://www.facebook.com/ads/manager/pixel/facebook_pixel/
- Login with your Facebook credentials
- Click on “Setup Pixel”
- Click on “Manually Install Code Yourself” (Refer Screenshot 2)
- Copy given script in step 2 (Refer Screenshot 3)*
*This script needs to be added in head tag creating a block in layout/default.xml as per Magento 2 logic.
- Click on “Continue”
- Click on “Install Events”
- Enable event you would like to track
- Select “Track Event on Page Load” if you want to trigger event on page load or “Track Event on Inline Action” if you want to trigger event on click something
- Copy event code which is generated. (Refer Screenshot 4) (This script needs to be added according to the event selected.)*
*E.g., if Purchase event is selected, we need to create a block on checkout success page i.e. Layout/checkout_onepage_success.xml. Here event parameters contain dynamic values from order object.
If you select Add to Cart event, a script needs to be added by creating a block in cart layout XML and as a parameter, values need to be passed dynamically from cart object.
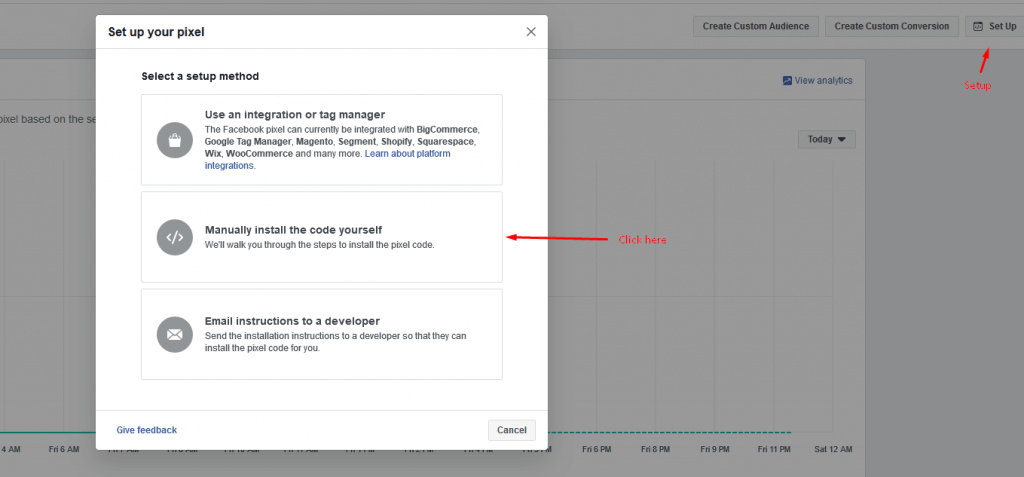
Screenshot 2
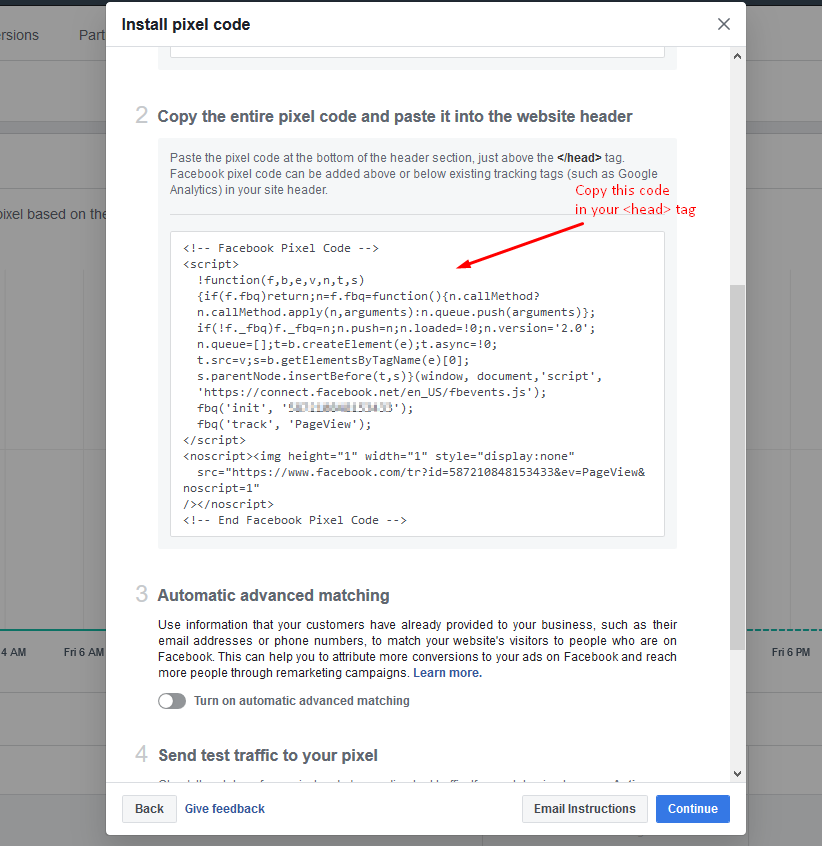
Screenshot 3

Screenshot 4
Steps collected details and check them by pixel:
- Visit https://www.facebook.com/ads/manager/pixel/facebook_pixel
- Login with your Facebook credentials
- You will find details in the “Events” tab under “Data Sources”
- Under events tab, detailed information will be found on clicking “View Details” (Refer Screenshot 5)
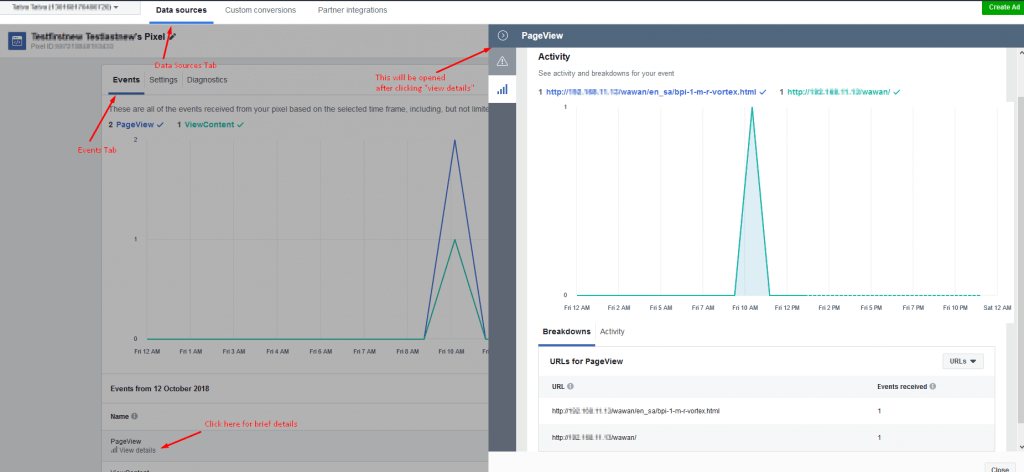
Screenshot 5
Steps to create a Custom Audience and Ad management:
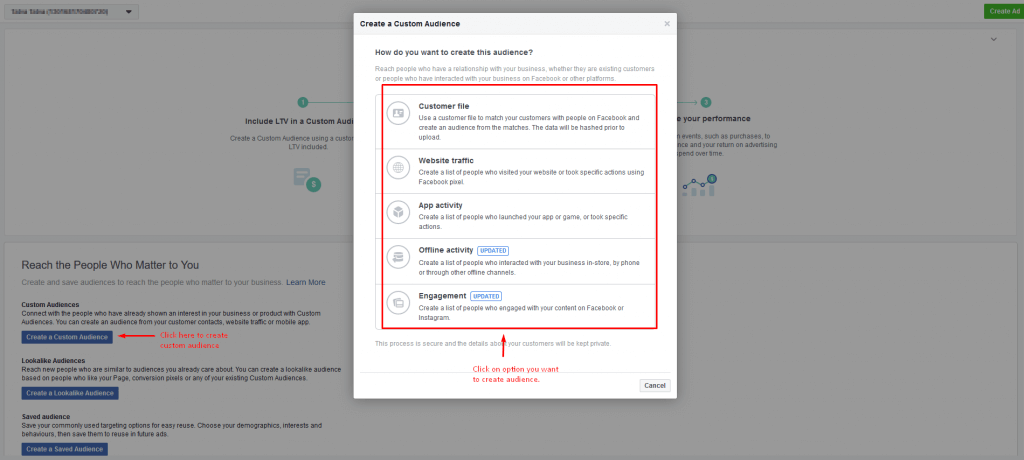
Screenshot 6
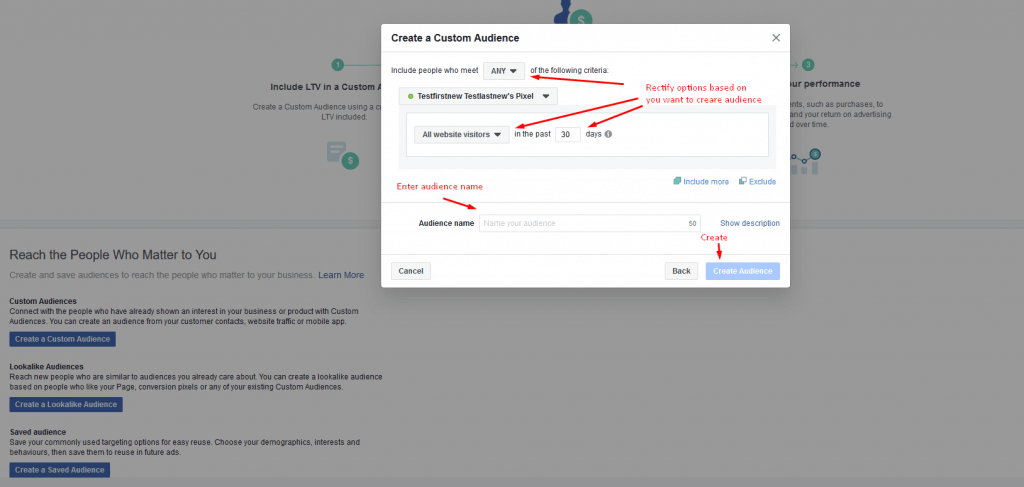
Screenshot 7
Steps to create Ad for the custom audience:
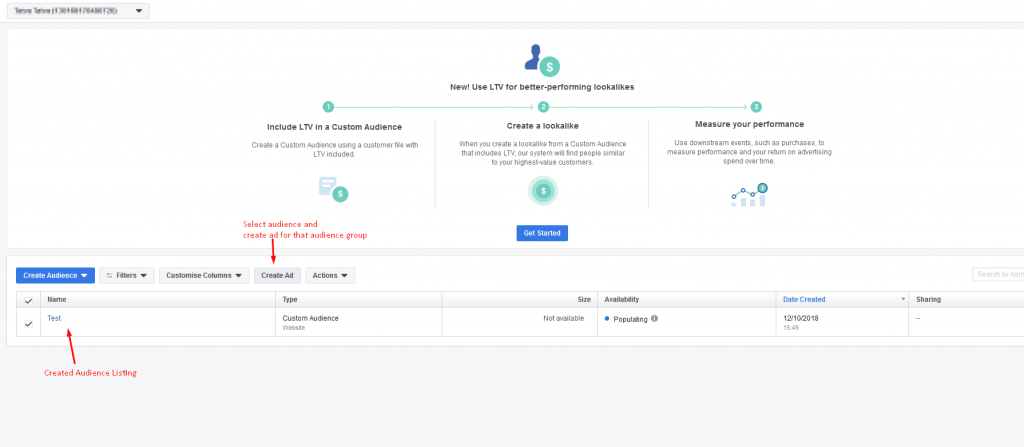
Screenshot 8
- Visit https://www.facebook.com/ads/manager/audiences/manage
- Login with Facebook credentials
- Select custom audiences created from listing and click on “create ad” option. (Refer Screenshot 8)
Create a custom conversion:
Conversion is any action done on site.
We have checked standard Facebook events which can track your store and show collected data, but what if the user needs to create a custom event to track your store. This custom event is called as a custom conversion.
By creating custom conversions, you can divide your event data based on values, event types, custom data fields and other characteristics for more detailed reporting in Ads Manager.
Custom conversion allows you to measure unique activities and optimize your ads for the events that matter most to your business. Create a custom conversion by applying rules to existing events.
Steps:
- Visit https://www.facebook.com/ads/manager/pixel/facebook_pixel
- Login with Facebook credentials
- Go to “custom conversions” tab.
- Click on “Create Custom Conversion” (Refer Screenshot 9)
- Now apply rules and enter a name and select category and click on “Create”
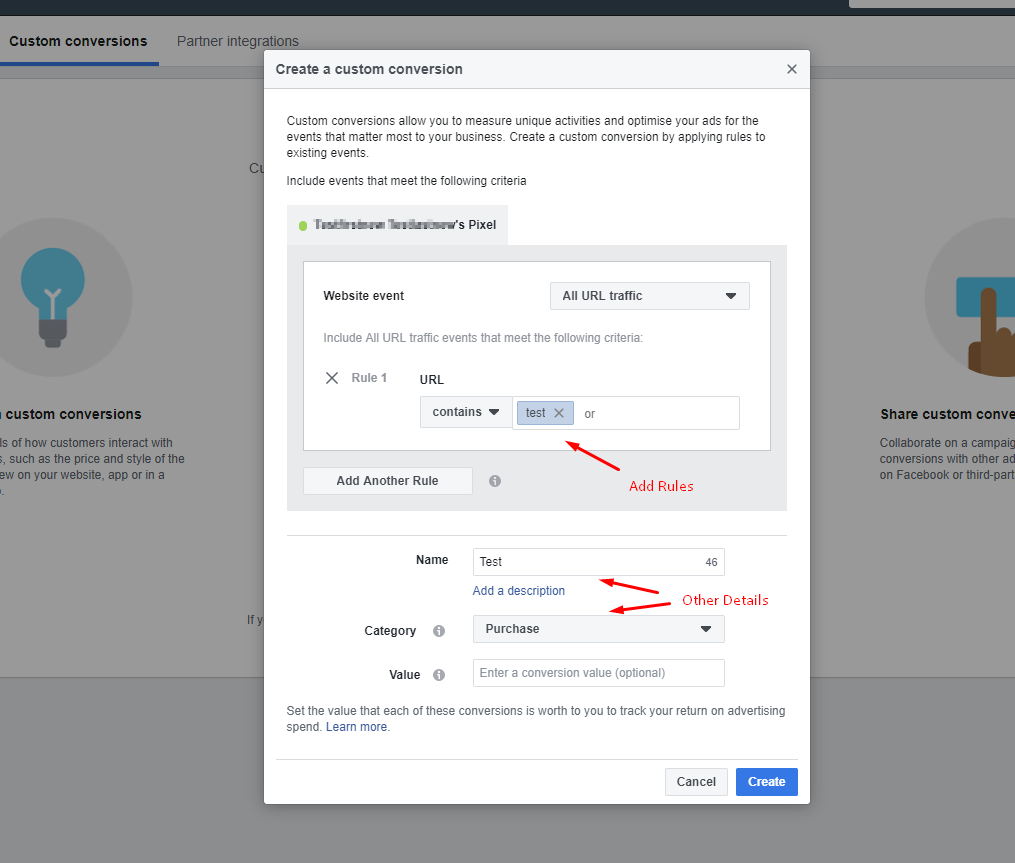
Screenshot 9
Standard events vs Custom conversions:
Standard events give more and accurate features than custom conversions, but custom conversions are much easier to set up in Magento project.
Custom conversions are created in Ad Manager using Url rules, whereas to create standard events, we have to add Facebook pixel base code.
Also in standard events, dynamic values are passed as parameters.
So standard events are compatible with dynamic product ads, whereas custom conversions are not compatible with dynamic product ads.
Pixel Helper:
Pixel Helper is a tool that helps to check whether your pixel is working correctly or not.
This is a plugin on “Google Chrome” browser you can use to see if Pixel is installed on a site, any error is there and understands the data.
Install:
Google Chrome browser is a must for troubleshooting the Facebook pixel. Install “Facebook Pixel Helper” extension on chrome browser.
Now click the Pixel Helper icon in the address bar.
If the Helper finds a pixel on your site and there are no errors, you can start with Facebook ads with your pixel. (Refer Screenshot 10)
If pixels were not found or there is an error, you can check with common errors reported by Pixel Helper.
Common Errors reported by Pixel Helper:
- No Pixel Found: You will need to place pixel code in your site
- Pixel Did Not Load: Helper may have found pixel code on your site but isn’t passing back data from your site (there could be an error in your pixel base code)
- Not a Standard Event: Found event doesn’t match one of 9 standard events
- Pixel Activated Multiple Times: Your pixel sent the same signal multiple times to Facebook. To avoid this, make sure that you have included pixel base code or event code on your site only once
- Invalid Pixel Id: Pixel Id isn’t recognized by Facebook. To avoid this, copy pixel Id assigned with your active ad account and paste in pixel Id in your pixel base code.
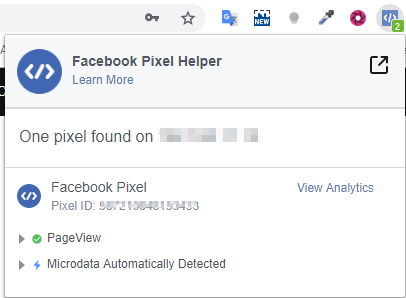
Screenshot 10
Tell us about your project
Hire dedicated Magento developer from the vast and talented pool of resources.


